This is a actually a message for my Dutch readers, because the workshop will take place in the Netherlands.
I had reserved a place in a woodworking and woodcarving workshop from IGMA fellow Ann High. (this is her website http://www.annhigh.co.uk/) Her work is breathtaking and I wanted to attend this workshop so badly. Unfortunately due to circumstances it became impossible for me to attend.
I feel so guilty for cancelling, since the workshop needed a minimum number of participants. So here is my "offer". If you attend the workshop in my stead, I'll gift you the downpayment.
Here is the link to the workshop http://anneliesdekort.nl/workshop.html
It takes place in 'Elst' on the 22nd and 23rd of March. There are some really nice and cheap Bed and Breakfasts nearby, I can give you their info if you like.
The main subject would be this Salisbury chair, but you can also make the carved chest instead if you wish.
If this sounds interesting to you, contact me so we can work out the details! (my email adress is: annekekarel AT hotmail DOT com)
zaterdag 8 februari 2014
dinsdag 13 november 2012
Wood floor... any ideas??
The floor of the dining room is finally done... and I can't stand to look at it anymore right now haha! This was so much work, cutting every single strip by hand with a knife, sanding, fitting, glueing... I have been working on it every now and then for months and therefore I'm so happy it's done!
Well, almost done that is... I still have to sand it, and oil it. There are also quite a lot of little gaps in there.
But the thing is I'm a little scared to sand it! Can I really just sand the entire surface in any direction now? It seems that if I'd sand it now, there will always be parts that you don't sand in the right direction... And those gaps... could I fill the gaps with a little glue and then just sand the whole thing or would that become a mess...
Maybe some of you who have done this before can give me a hint? What's your experience with this?
Now I can start puzzling with the bay window, it will be quite the angle cutting frenzy!! Also I'm making a chandelier for this dining room, and I'll try to make it into a tutorial.
Well, almost done that is... I still have to sand it, and oil it. There are also quite a lot of little gaps in there.
But the thing is I'm a little scared to sand it! Can I really just sand the entire surface in any direction now? It seems that if I'd sand it now, there will always be parts that you don't sand in the right direction... And those gaps... could I fill the gaps with a little glue and then just sand the whole thing or would that become a mess...
Maybe some of you who have done this before can give me a hint? What's your experience with this?
Now I can start puzzling with the bay window, it will be quite the angle cutting frenzy!! Also I'm making a chandelier for this dining room, and I'll try to make it into a tutorial.
maandag 5 november 2012
David Iriarte workshop @ Apeldoorn show
I promised to be a more frequent poster, so here I am again! =)
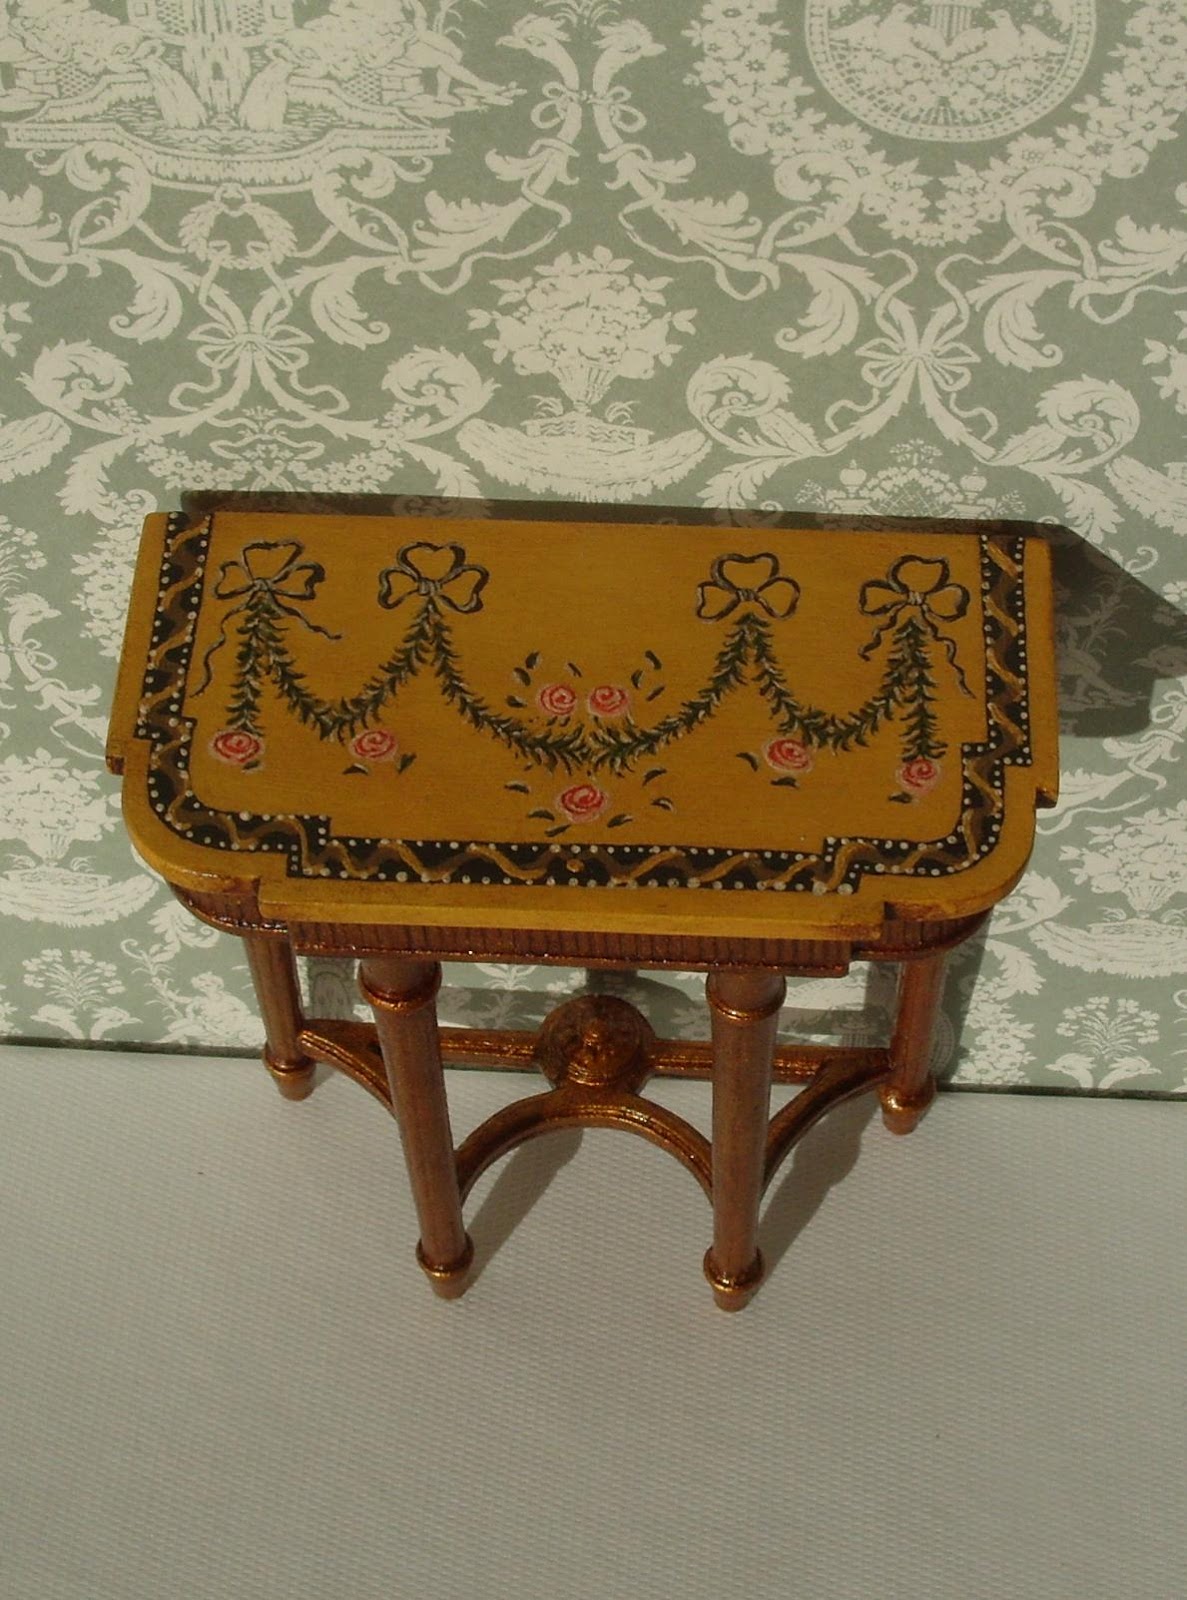
When I found out that on the 26 of October there would be a workshop by David Iriarte in Apledoorn, a day prior to the Apeldoorn dollhouse show, I immediately signed up!
The example picture of the side table we where going to make looked exquisite! First I was so excited that such an incredible artist was giving such a workshop! Then my excitement sank to an ultimate low when I realised I would have to paint this difficult and intricate pattern on the tabletop myself....
But I bought some tiny tiny paintbrushes, gathered my courage and drove to Apeldoorn for a weekend filled with miniature goodness.
It turned out I my fear of painting was totally unnecessary! David was the most patient, kind and helpfull teacher ever and I ended up enjoying every bit of the workshop so very much, including the painting job!
I didn't finish my side table at the workshopday, I am a bit of a slow worker... But I wanted to do it as perfect as possible... and David taught us every technique we needed to finish the work at home.
During this workshop I learned so much, even from my fellow students! I really hope to take more classes of some kind in the future because it has surpassed my every hope and expectation!
It was so scary to finish with the patina, after all the hard work I was a bit scared I would ruin it. But it turned out very nice I think, it looks nicely aged now. I'm not yet sure in wich colorscheme and in wich room this table would fit best, but finding out is part of the fun!!
When I found out that on the 26 of October there would be a workshop by David Iriarte in Apledoorn, a day prior to the Apeldoorn dollhouse show, I immediately signed up!
| My end result |
| Stands are being build for the next day |
The example picture of the side table we where going to make looked exquisite! First I was so excited that such an incredible artist was giving such a workshop! Then my excitement sank to an ultimate low when I realised I would have to paint this difficult and intricate pattern on the tabletop myself....
| During the workshop |
But I bought some tiny tiny paintbrushes, gathered my courage and drove to Apeldoorn for a weekend filled with miniature goodness.
It turned out I my fear of painting was totally unnecessary! David was the most patient, kind and helpfull teacher ever and I ended up enjoying every bit of the workshop so very much, including the painting job!
| First result after the workshop |
I didn't finish my side table at the workshopday, I am a bit of a slow worker... But I wanted to do it as perfect as possible... and David taught us every technique we needed to finish the work at home.
| Finishing at home |
| Adding more details and shading |
| Finished the decorating... on to the patina! |
It was so scary to finish with the patina, after all the hard work I was a bit scared I would ruin it. But it turned out very nice I think, it looks nicely aged now. I'm not yet sure in wich colorscheme and in wich room this table would fit best, but finding out is part of the fun!!
dinsdag 30 oktober 2012
Souvenirs
It's been a long time since my last post, and so much happend IRL! I'll give you a list, to keep it short 'n sweet!
1) finished internships and assignments
2) got my bachelor of education in mathematics degree
3) celebrated with ridiculous party
4) did some traveling
I think those are some good reasons for my absence! Now things are more calm again, and so there is time for miniatures and blogging again!
I'll start slow, by showing some of the souvenirs I brought for my dollshouse. I like bringing back souvenirs that I can use for my dollshouse because they don't take up a lot of space and it will gives a bit more meaning to the hobby for me. So here is a quick picture of the reindeermoss I brought from Norway, I'll use that for plant and flower making.
Also shown here are some teeny tiny mussel shels, that I actually scraped of the bottom of our sailing boat... ieuw! But quite pretty!
And last but not least, a little crown... I usually would never buy a crown to put in my dollshouse, it's a bit out of place when it's not a castle.. But since my dollshouse is a German Schloss I thought it would be o.k.! Right? ;) I found this tiny 'Reichskrone' at the imperial treasury in Vienna, where the famous Reichskrone of the Holy Roman Empire is on display.
1) finished internships and assignments
2) got my bachelor of education in mathematics degree
3) celebrated with ridiculous party
4) did some traveling
I think those are some good reasons for my absence! Now things are more calm again, and so there is time for miniatures and blogging again!
I'll start slow, by showing some of the souvenirs I brought for my dollshouse. I like bringing back souvenirs that I can use for my dollshouse because they don't take up a lot of space and it will gives a bit more meaning to the hobby for me. So here is a quick picture of the reindeermoss I brought from Norway, I'll use that for plant and flower making.
Also shown here are some teeny tiny mussel shels, that I actually scraped of the bottom of our sailing boat... ieuw! But quite pretty!
And last but not least, a little crown... I usually would never buy a crown to put in my dollshouse, it's a bit out of place when it's not a castle.. But since my dollshouse is a German Schloss I thought it would be o.k.! Right? ;) I found this tiny 'Reichskrone' at the imperial treasury in Vienna, where the famous Reichskrone of the Holy Roman Empire is on display.
That's it for today, and I'll try and be a more frequent poster ;)
Labels:
1:1 real life,
1:12,
mathematics,
souvenirs,
teacher
zondag 12 februari 2012
Ice and miniatures
I just realized how long I haven't blogged. There hasn't been much miniature progress lately, real life got in the way ;).
It has been quite cold here in Friesland in the Netherlands. So all the canals froze over. This equals ice skating bonanza/heaven here in Friesland! And you won't hear me complain!
The canal behind my parents house was the ideal place to start and end many ice skating trips, and I've been doing just that this past week!

These pictures where taken very near my parents house. With frozen fingers after quite a few kilometers of skating ;p
This picture shows a view of the village where I grew up.
On the miniature-topic, I finished 1 wall... yes 1. I still have to figure out how I'll create the walls in the bay-window part. I want to make deep sills, but that will be a little difficult to do neatly. But where there is a will...
Meanwhile I'm cutting tons of little veneer strips for the floor. A big room is what I wanted, but that also means a big pile of strips to cut! That's o.k. it's quite therapeutic. And I still need to tackle the mirror for the overmantle.
I'm also working on a tutorial for a chandelier to share with you all... Better stop talking and start working! :D
I should let you all know, that I sent my proxxon saw back to the store and got a completely new one. It makes a different sound and seems to work perfect so far. I'm very happy with how this was solved! (see previous post)
It has been quite cold here in Friesland in the Netherlands. So all the canals froze over. This equals ice skating bonanza/heaven here in Friesland! And you won't hear me complain!
The canal behind my parents house was the ideal place to start and end many ice skating trips, and I've been doing just that this past week!
These pictures where taken very near my parents house. With frozen fingers after quite a few kilometers of skating ;p
I'm also working on a tutorial for a chandelier to share with you all... Better stop talking and start working! :D
I should let you all know, that I sent my proxxon saw back to the store and got a completely new one. It makes a different sound and seems to work perfect so far. I'm very happy with how this was solved! (see previous post)
vrijdag 28 oktober 2011
Schloss dining room progress 2
I've been thinking about this hearth for quite a while, how to construct it, what material to use, how will I make it look just like the one from my inspirationpicture. Here is what I came up with. I used MDF, coffee stirrers, cardboard, popsicklesticks and some fancy woodstrips.
I'm constantly putting the pannel back into the room to see if the sizes work.
Afther the hearth was an obstacle overcome, I could move onto the panneling. This is something I've been wanting to do for a long time! There was no way panneling would look good in my modern dollhouse, but with the Schloss I can 'pannel' to my hearts delight!
I'm a bit of a perfectionist and this part required lots of time, measuring, fitting and redoing.
There will be a extension mantel piece on top of the hearth, it is to flat and unrealistic like this. But I'm still figuring out what material to use now that my tablesaw is out of order...
I've seen this beautifull mirror here from Lucy Askew that would be marvelous for this room. It looks so much like the inpiration picture and it would fit so nicely, but I'm still indecisive about paying 40pounds for a mirror. I could totaly reason my way into buying it, but then again where do I draw the line when I have more than 12 rooms to decorate?
And because I needed to see how the sizes would work (and secretly for pure enjoyment) I put the pannel into the room. Offcoures all the loose parts fell down. But when I squint my eyes I can see how this will work out, and I like it!
Now I'm waiting for the veneer I ordered to arrive. A dark nut wood, or a teak floor will be the next thing to do here.
I'll conclude with this non-related picture, that I took this week on one of the last sunny days. This is my parents' cat, who thinks he owns our boat with his big hairy ... XD
woensdag 19 oktober 2011
Schloss dining room in progress

The dining room is the first room I'll work on, since it has been on my mind the longest and the ideas I had for it where the clearest.
I'm working on 'presentation cardboard' whatever that may be (It was the closest thing to foamcore the local craft store had).
The fireplace will be pitchblack, the overmantle off-white just like the panneling. The yellowish wallpaper will be on there and all the corner and framing wood will also be off-white.
I think the floor will be wallnut, but I'm not sure yet.
This picture was the main inspiration for the dining room. It is the frontroom of 'Hid Hero Hiem' in Bolsward. It used to be an orphanage and now it is a monument. I worked at a school nearby and a colleague was involved in the restoration of the whole building and it's rooms. So we went to visit. Needless to say it was very inspiring!
I've written about my compains to the company, I'll post the outcome.Last but not least I've been having some problems with my proxxon table saw. Perhaps someone can help me out?
Whenever I put it at an 45degree angle, it starts smoking after a short while of sawing! Attaching the vacuumcleaner or not makes no difference. The smoke is not from the wood that is being cut, but comes from inside. The blade is not touching anything as far as I can see... It doesn't seem to be good or normal for such a saw as this one to be smoking at a certain angle...
Today after this happening again, it also gave me little static shocks! I don't feel save using it anymore now... any advice or experience on this matter?
maandag 17 oktober 2011
The 'Schloss' in progress
An entire year has passed since I received the building plans for this dollhouse.
I've put many hours of my time into calculating, measuring, sawing, building and imagining since.
So whats the score at this moment? The dollhouse is almost completely put together. I have all the parts cut out, but I wont assemble it completely. I think I'll be moving in a few years, and I wouldn't be able to get it out of the room or out of the house ever again if I did assemble the house permanently!
So in the pictures the large library wing is still missing, and the huge roof and tower are not included in todays pictures either.

But the good news is that I can start with the interior, and along with that the exterior and neatly finishing all those odds and ends. And it is never to0 early to make flowers for the Schloss!
It's still going to be a german castle/mansion in the middle of the woods, meadows and mountains. So that's why I'll call it a 'Schloss'.
Some of the furniture you see is actually meant for the Schloss, but most of it is from my modern house to help my imagination.

I've bought some wallpaper and other supplies to start the real work. Oh you should see the stock of fabrics I've gathered! It's unhealthy! (I'll show that later!)
Please forgive the messy-ness of it all, the paper things in the hallway is to help design a good stairway.

I wanted to make removable walls but I can't find the material that I'd like. So for the first room I'll try a special thick cardboard, so that I can work on a flat surface and afterward install it into the house.
The house is way to deep to be making everyting straight onto the walls inside in a neat way. And I don't think I want to hear anymore funny comments about being a 'dollhouse-gynecologists'! :P haha
I've put many hours of my time into calculating, measuring, sawing, building and imagining since.
So whats the score at this moment? The dollhouse is almost completely put together. I have all the parts cut out, but I wont assemble it completely. I think I'll be moving in a few years, and I wouldn't be able to get it out of the room or out of the house ever again if I did assemble the house permanently!
So in the pictures the large library wing is still missing, and the huge roof and tower are not included in todays pictures either.
But the good news is that I can start with the interior, and along with that the exterior and neatly finishing all those odds and ends. And it is never to0 early to make flowers for the Schloss!
It's still going to be a german castle/mansion in the middle of the woods, meadows and mountains. So that's why I'll call it a 'Schloss'.
Some of the furniture you see is actually meant for the Schloss, but most of it is from my modern house to help my imagination.
I've bought some wallpaper and other supplies to start the real work. Oh you should see the stock of fabrics I've gathered! It's unhealthy! (I'll show that later!)
I wanted to make removable walls but I can't find the material that I'd like. So for the first room I'll try a special thick cardboard, so that I can work on a flat surface and afterward install it into the house.
The house is way to deep to be making everyting straight onto the walls inside in a neat way. And I don't think I want to hear anymore funny comments about being a 'dollhouse-gynecologists'! :P haha
woensdag 31 augustus 2011
Byzantine miniature icons and tiniest seashells ever!
I'm back home from a very wonderfull holiday in Greece. Surprisingly and unintended I found lots of wonderfull miniatures during my trip!
First of all, these copies of old Byzantine icons. My pictures don't do justice to the detail in them. They are so small and precise, the pictures don't show it but you can see the relief of the paint strokes, they are so unbelievably small!
Please do click on the pictures to see the large original size, to see more details.
These icons will go in my new dollhouse in the making, a small castle.
Last but not least! We were on a beach, for a lazy day in the sun and some snorkling. I was happily bored and I was lazily running some of the grit/sand trough my fingers. I suddenly noticed a tiny tiny seashell in it!
Please click the pictures to see them larger. I think nature made the most precious mini's ever and I'm glad I found them!
donderdag 18 augustus 2011
Bedroom finished!
Can you guess what this will become? I've been playing with the tablesaw again, there was something in the Ikea catalog that was still missing in the bedroom I'm giving a make over.
And what's a dollhouse room make over without new modern lights? So I rummaged around in my hobby drawers and found what I needed.
Did you guess? The woodbits will make 2 nightstands, inspired by these.
I painted them black, because that would match best with the other things in the bedroom. Because they'd become black I didn't mind the non-matching wood.
And here is a little nightstand, with a new modern nightlight on top!
It was evening when I took these pictures, so they aren't very sharp and bright.. But I wanted to show the bedroom and how it looks right now. I did a LOT of work on this room and I love how it turned out! The new bedding, the curtains, the floor, all the furniture I made, it was quite a bit of work and it all came together very nicely if I may say so myself.
The dresser I showed in the previous post was inspired by this one and is now finished up.
Abonneren op:
Posts (Atom)